The video editor turns a raw recording into something ready to share: cut out mistakes, add text, images and captions, blur private details, clean up the sound, and export a new file. It can also make a video from scratch out of your photos. Your original files are never changed; exporting always creates a new file.
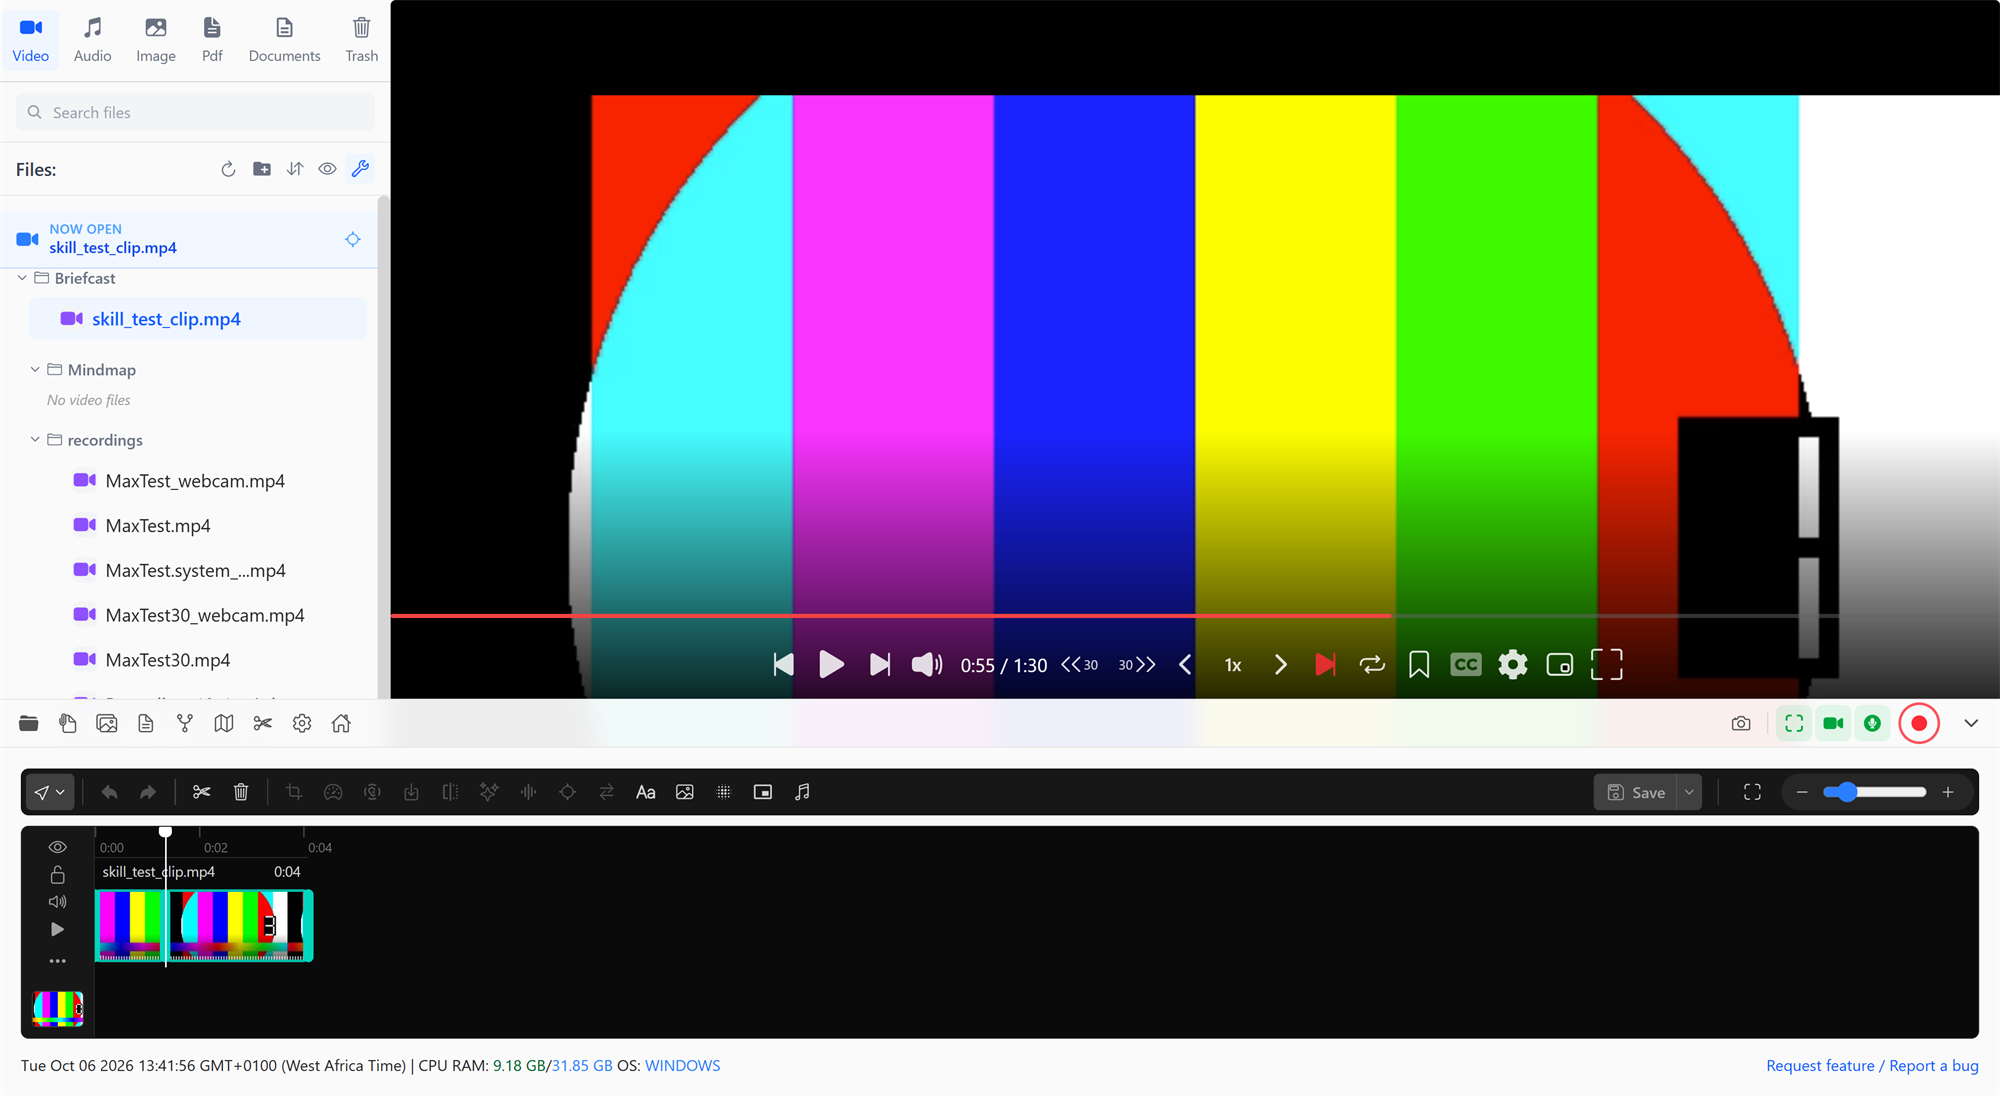
Opening a video for editing
- Click the scissors icon in the bottom bar. The Video Editor screen lists every video in your library and the ones you edited recently, plus Open video from anywhere for files outside the library and Create video from images for a new video (see below).
- Or open a video from the library and click Show tools for this file (the wrench) in the sidebar.
The player sits at the top and the timeline below it. Your edits are saved automatically as you work. Close Briefcast, come back tomorrow, and they're still there. If the window reloads, for example after your laptop wakes from sleep, Briefcast reopens the video you were editing.
Making a video from images
Turn a set of photos into a slideshow, a recap or a short explainer, with movement, transitions, music and text.
- On the Video Editor screen, click Create video from images.
- Pick images from your library or Add from computer…. They play in the order you pick them; hover over one in Clips to move it earlier or later, or remove it.
- Choose a Frame: 16:9 (landscape), 9:16 (portrait, for phones and stories), 1:1 (square) or 4:3.
- Set how long each image shows (5 seconds by default), and whether to add Slow zoom & pan (gentle Ken Burns movement on every image) and a Crossfade between images.
- Click Create video.
The editor opens with one clip per image, and everything in this guide works on them: reorder, trim, transitions, color, crop, text, music, captions and more. Pick nothing and click Start blank for an empty timeline; drop images or videos onto it, or click Add media.
- Any mix of sizes and orientations works. Each image is fitted into the frame without stretching, with black bars where its shape differs.
- iPhone photos (HEIC/HEIF) work like any other image, and phone photos always appear the right way up.
- An image clip starts at the length you chose and can be stretched up to 10 minutes by dragging its right edge.
- The video is kept in your library as a project (a
.briefvideofile), so you can reopen it and keep editing. Save turns it into a normal video,<project name>.mp4, next to the project.
You can also add images to any recording's timeline the same way you add videos.
The timeline
- Clips lane: your video, as one or more clips (videos or images). Drag a clip to reorder it; drag its left or right edge to trim its start or end. Right-click a clip for its clip menu.
- Overlay lanes: text, images, blur regions, picture-in-picture videos and extra audio each get their own lane. Drag an item to move it in time, and its edges to change when it starts and ends.
- Playhead: click anywhere on the timeline to move it; the player follows.
- Track controls: each lane can be hidden from the preview, locked against accidental edits, and (for audio) given its own volume or muted.
- Zoom: zoom in for precise cuts, zoom out, or Fit to window.
To combine several videos or images, drag them from the library or from File Explorer onto the timeline, or click the + after the last clip and pick as many as you like. They're added as clips, in order, that you can trim and reorder like the rest. Insert videos or images… in the track's … menu does the same after the clip under the playhead.
Undo and Redo cover every edit.
Cutting
- Split at playhead: cuts the clip at the playhead into two clips.
- Razor tool: switch the Select tool menu to Razor, then click anywhere on a clip to cut it there. It stays on, so you can make several cuts in a row; switch back to Select when done.
- Delete: removes the selected clip, or the clip under the playhead.
- Trim silence: finds the silent gaps in a clip (long pauses, the time before you started talking) and lists them. Nothing is removed until you click Remove.
Clip tools
Select a clip on the timeline, then use:
- Crop: drag the crop frame directly on the video to cut off edges, such as a taskbar or a browser's tabs. Any shape is allowed; it doesn't have to keep the video's proportions.
- Speed: 0.25× to 4×, with quick presets (0.5×, 1×, 1.5×, 2×). It shows the resulting length, and you can type the length you want instead.
- Speed ramp: speed that changes across the clip. Slow-mo moment slows into the middle and back out, Fast → slow → fast rushes in and out, Speed up accelerates, Slow down eases into slow motion. Amount sets how far it swings; a small graph shows the speed through the clip. The ramp plays live, picture and sound, and exports to the exact same length.
- Mirror: flips the clip left to right.
- Effects:
- Color: Vibrant, Cinematic, B&W, Warm, Cool or Vignette, with adjustable intensity.
- Ken Burns: a slow zoom in or out, or pan left or right, for movement over still footage.
- Stabilize: Remove camera shake smooths handheld footage, with a Strength slider. The first export or View clip of a stabilized clip takes about as long as the clip, because Briefcast first studies its motion; after that it's instant.
- Transition from the previous clip: Crossfade, Fade to black, Dissolve, Wipe, Slide, Circle open, Zoom in, Radial or Pixelize.
Color grading
Under Effects → Color grading, correct and grade a clip like in a dedicated grading app:
- Exposure (in stops), Contrast, Saturation, Temperature (cooler to warmer), Tint (green to magenta), Highlights and Shadows. Double-click a slider to reset it.
- Import LUT (.cube)… applies a 3D LUT: your camera maker's log-to-Rec.709 conversion, a film look, or a grade exported from DaVinci Resolve or Premiere. LUT amount blends it in. The LUT is applied first, then the sliders, so you can correct on top of it.
- A live histogram of the picture as graded (red, green and blue) helps you avoid crushing blacks or clipping highlights.
- Hold to compare shows the clip without its grade while held. The reset button clears the whole grade.
What you see while grading is exactly what exports: the preview and the export apply the same color table. A grade works together with the Color presets above.
What you see is what exports
Crop, mirror, Ken Burns, speed ramps, transitions and color are drawn in the preview with the same arithmetic the export uses, so framing and timing match to the pixel and the frame. Clips of different shapes in one video preview exactly as they export: fitted into the video's frame, with black bars where their shape differs.
Splitting or cutting a clip keeps everything on both pieces: its look, grade, stabilization, sound clean-up and speed. A speed ramp or Ken Burns move carries on across the pieces instead of starting over, so the pieces play exactly as the whole clip did.
Transitions
A transition plays over the start of the clip it leads into: the previous clip's last frame gives way to the new clip as it begins. It plays live in the preview, exactly as it will look in the exported video, whether you're playing or scrubbing.
Each transition is marked on the timeline: a shaded band over the stretch it plays across, and its name in small type under the cut. Click the name to change or remove it.
Transitions never shorten your video. The timeline's length is the exported video's length, so text, images and captions stay exactly where you put them.
Image clips
Crop, speed, mirror, color, Ken Burns and transitions all work on image clips. The tools that need recorded sound or recording data (Clean up audio, Extract or detach audio, Trim silence, Auto zoom and Apply view switches) are greyed out for them.
Clean up audio
Clean up audio removes noise from a clip's sound:
- Mode:
- Reduce turns down steady background noise (fans, hiss, room tone) and keeps the sound natural.
- Remove keeps only the voice and strips everything else.
- Strength: how much to apply.
- Extra clean-up:
- Low-cut: rumble and wind.
- Remove hum: the electrical buzz from mains power, at 50 or 60 Hz.
- Gate: silences the gaps between phrases.
- Loudness levelling: evens out the volume.
- Waveform: before and after, so you can see the difference. In Reduce mode, drag across a quiet part of the waveform to show Briefcast what the noise sounds like.
Play the clip to hear the changes live; they're applied for real when you export.
Extract or detach audio
- Extract saves the clip's sound as its own MP3, WAV or AAC file.
- Detach moves the sound onto the audio lane, so you can edit it separately from the picture:
- Each audio track separately: one lane per audio track, for example your microphone and system audio from a recording.
- Voice and music (AI separation): splits mixed sound into a voice track and a music track, for example to turn down background music under narration. This needs a one-time download of the separation engine; Briefcast asks first and shows its size.
The clip menu
Right-click any clip for the things you most often do to it:
- View clip: plays just that clip in a popup, looping, with its speed and effects. The main player pauses while it's open.
- Save clip as…: exports only this clip, with its effects, as its own MP4.
- Split at playhead (when the playhead is inside the clip), Duplicate, and Move earlier, later, to the start or to the end.
- Freeze frame at playhead: holds the frame under the playhead for 2 seconds, as its own still clip you can lengthen like an image.
- Reverse: plays the clip backwards, picture and sound. Every frame is kept. Choose it again to play forwards.
- Transition in, Motion (Ken Burns) and Color: pick one straight from the menu. Each shows the clip's current choice.
- Length (image clips): 2, 3, 5, 8, 10 or 15 seconds.
- Mirror, and All effects… for the full effects panel with intensity sliders.
- Show source in folder, and Delete clip.
Every action can be undone.
Adding things on top
Click a tool, then click the video where you want it:
- Text: type directly on the video. Style it with font, colour, outline and background, and give it an entrance animation: Fade, Pop, or Slide in from any side.
- Image: a logo, a diagram, a photo. Drag to place it and drag its corners to resize. Crop opens a larger view for precise cropping.
- Blur region: hides an email address, a password, a face. Drag and resize it over the area, and set when it starts and ends on its lane.
- Picture-in-picture video: another video on top, typically a webcam recorded separately. See below.
- Audio: background music or narration, with its own volume, fade in and fade out, mute, duplicate and delete.
Motion keyframes
Text and images can move, grow and fade over time. In the overlay's panel, under Motion, click Add keyframe at playhead, move the playhead, then move or resize the overlay (or set Scale and Opacity): it glides between the keyframes. Each keyframe can Hold, or move Smooth, Linear, Ease in or Ease out to the next one. Moving a keyframed overlay sets its keyframe at the playhead. The motion plays live in the preview, exactly as it exports.
Cutting to the beat
Click a music track on the audio lane, then click Find beats in its settings. Briefcast finds the tempo and every beat (it shows the BPM), marks the beats on the timeline, and makes dragging snap to them. For a slideshow, Cut images on the beat (every beat, every 2 or every 4) times every image to end exactly on a beat. Hide beats removes the markers.
Picture-in-picture
When you record with Record webcam separately (or with your phone as the camera), the webcam arrives as a picture-in-picture layer instead of being baked into the recording. You can:
- drag it anywhere and resize it;
- change its shape (rectangle, rounded or circle) and crop it;
- cut it at the playhead or delete pieces of it, for example to hide the camera during a demo.
Auto zoom on clicks
If Track clicks was on while you recorded, Auto zoom finds every click in the selected clip and adds a smooth zoom toward each one, so viewers can see what you clicked. Briefcast shows how many it found and adds nothing until you confirm.
Apply view switches
If you switched between screen and camera while recording (Alt+Shift+V), Apply view switches turns each switch into a real cut to the camera. As with auto zoom, you confirm before anything changes.
Edit by transcript
Edit by transcript (the page icon on the toolbar, next to Captions) shows everything said in your video as text, and turns editing words into editing video. It's the fastest way to tighten a talk, a tutorial or an interview.
- Transcribe once. It runs offline on your computer and nothing is uploaded. Filler sounds like "um" and "uh" are kept in the transcript, so you can see them and remove them.
- Click a word to jump to it. Drag across words, or click one and Shift+click another, to select. Then press Delete (or Cut) to remove them from the video. The pause after them goes too, so the speech joins up naturally.
- Clean up in one click. Hover over a button first to see what it would remove, highlighted in the text.
- Remove filler words: "um", "uh", "erm", "hmm" and similar, shown in amber in the text.
- Remove repeated words: stutters like "the the" (keeps the second).
- Shorten long pauses: every pause longer than the time you choose (0.75 to 2 seconds) becomes a short, natural 0.3 seconds. Pauses are measured in the sound itself and marked in the text with their length; click a marker to shorten just that one.
- Each button shows how many it found and how much time it saves.
Every cut is one undo step (Ctrl+Z). Cuts are ordinary clip edits, so the timeline, captions and export all follow along. The transcript is the same one the Captions tool uses: transcribing here doesn't turn on burned-in captions, and generating captions later doesn't transcribe again.
Captions
Captions (the CC button on the toolbar) turns the speech in your video into captions that are burned into the exported video, so they show everywhere it's played, including on social media with the sound off.
- Generate captions: Briefcast writes them from the audio with its built-in speech recognition. It runs entirely on your computer, nothing is uploaded, and it works offline. Choose a Language or let it detect one. The speech model downloads once, the first time. If you close Briefcast mid-way, it can pick up where it stopped.
- Or use an existing .srt or .vtt file. Word highlighting is estimated, since these files only time whole lines.
- Style: 15 looks, including Highlight, Outline, Clean, Card, Classic, Pop, Neon, Bubble, Typewriter, Comic, TV, Headline, Button, Spotlight and Chip.
- Position (top, middle or bottom) and distance from the edge, Size, Words per line, Word emphasis (the word being spoken stands out, in a colour you choose) and ALL CAPS.
- Edit captions: every line is listed with its time and follows playback. Click a line to jump to it, or edit its text to fix a misheard word. Copy or Download them as plain text, for a transcript or show notes.
- Show captions turns them on or off without deleting them; Remove captions deletes them. Transcribing again in another language replaces your edits.
Captions follow your edits: cut or reorder a clip and its captions go with it.
Exporting
Click Save to export. The new file is saved next to the original, named <original name> (edited) with the same extension as the original (a second export becomes (edited) (1)), and the original isn't touched. A video made from images is saved as <project name>.mp4 next to its project.
The arrow next to Save opens Export options:
- Quality:
- Smaller file: faster to share.
- Standard: the default.
- High quality: larger files.
- Destination: next to the source file (default), or Choose location… anywhere else.
- Format: keep the video's own frame, or make it 16:9 (YouTube, presentations), 9:16 (Shorts, Reels, TikTok), 1:1 (square posts) or 4:5 (Instagram and LinkedIn feed). When the shape changes, choose how the picture fits:
- Fit, blurred background: the whole picture, with the edges filled by a soft blur of itself.
- Fit, black bars: the whole picture, with bars.
- Fill: cropped to fill the new shape. With Follow the subject on, the crop follows the action: it holds still while things stay in view, eases to where the action moves, recentres at every cut and eases through transitions. Clicks recorded with Track clicks guide it too. Turn it off to place the crop yourself with the Left ↔ right and Top ↔ bottom sliders. While the options are open, the player highlights exactly the part of the picture that will be kept.
- Loudness: As mixed (no change), -14 LUFS (YouTube, Spotify and most streaming) or -16 LUFS (podcasts, Apple). The exported sound is measured and brought to the target within 0.1 LU, with peaks held below -2 dBFS, so it plays at the level the platform expects without being turned down or clipping. The picture isn't re-encoded for this.
Export shows its progress. If you close Briefcast during an export, it asks first. An export that fails or is cancelled leaves no half-written file behind.
Tips
- To tighten a talk, open Edit by transcript, remove filler words and shorten long pauses, then read through and delete any false starts. Fine-tune with Split and the razor if needed.
- For captions burned into the video, use Captions in the editor; for captions only while you watch, use the player.
- To make a short clip from a long recording, trim and Save, or right-click the clip and Save clip as…. The original stays complete.
- For a slideshow, set a length for all images when you create it, then right-click any image to give it more or less time with Length. Or add music, Find beats, and Cut images on the beat.
- For a vertical version of a landscape video, export as 9:16 with Fill and Follow the subject.