Briefcast records your screen, one or more webcams (or your phone), your microphone and the sound your computer plays, in any combination.
Quick start
- In the bottom-right corner, click the screen, webcam and microphone icons to choose what to record. Green means on.
- Click the red record button. The Screen Options window opens.
- Choose what to capture, check the preview, and click Start Recording.
- Stop with the Stop button in the bottom bar or on the recording bar, or press Ctrl+Shift+R.
Ctrl+Shift+R works from any app, even when Briefcast is in the background. It skips Screen Options and starts recording your whole screen with your current settings; press it again to stop.
What you can record
| Sources | Produces |
|---|---|
| Screen + Camera + Mic | A screen recording with your webcam in a corner and your voice |
| Screen + Mic | A screen recording with your voice |
| Screen only | A silent screen recording |
| Camera + Mic | A webcam video, no screen |
| Camera only | A silent webcam video |
| Mic only (Audio) | An audio recording |
You can set the default in Settings → Recording → Recording type.
Screen Options
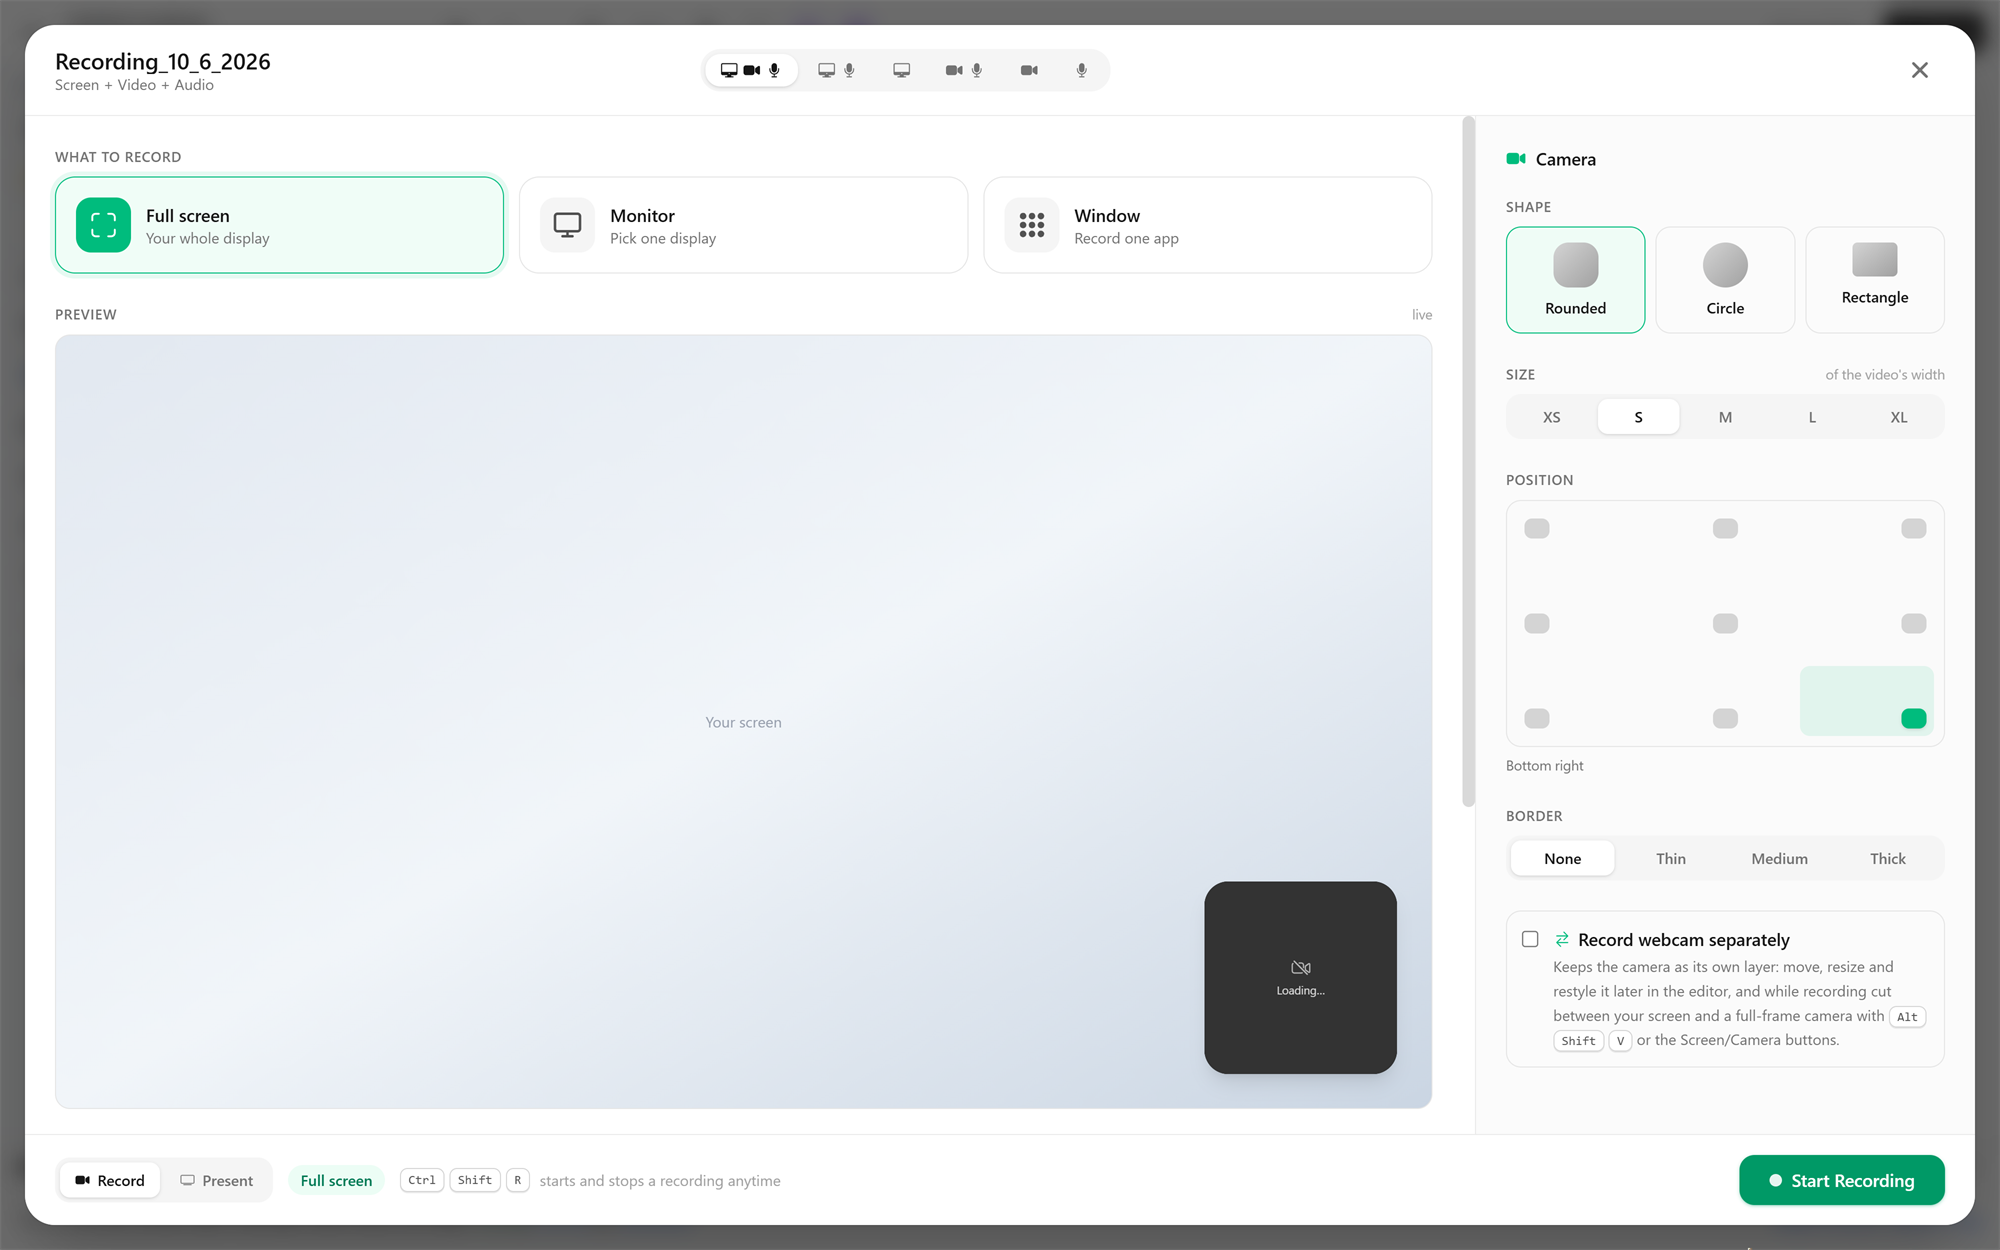
Screen Options is where you set up a recording before it starts. The icons at the top switch between the recording types (screen + camera + mic, screen + mic, and so on), and the file name is shown on the left.
What to record
- Full screen: your whole display.
- Monitor: one display, when you have several.
- Window: one app's window. Pick it from the list (refresh it if a window is missing). Only that window is recorded, even if others overlap it.
The Preview below shows what will be recorded.
Camera
When your recording includes the camera, the panel on the right sets how it appears in the video, and the preview shows the result:
- Shape: rounded, circle or rectangle.
- Size: XS to XL (10% to 30% of the video's width).
- Position: any of nine spots: the corners, the middle of each edge, or the centre.
- Border: none, thin, medium or thick, in any colour.
You can tick more than one camera in the camera list.
Options
- Microphone: which input to record from. Settings sets the default.
- System audio: also records what your computer plays (a video call, a video you're narrating over, notification sounds). It's recorded as its own track and automatically turned down while you speak. Available for screen recordings.
- Record webcam separately: records the webcam as its own file instead of baking it into the screen recording. You can then move, resize, reshape or remove it later in the video editor, and switch the main view between screen and camera while you record (see below). Needs exactly one camera.
- Track clicks: remembers where and when you clicked, so the video editor can zoom in on each click automatically.
- File format: MP4 (recommended), MKV, MOV, AVI or WebM for video; MP3, WAV, AAC or WMA for audio.
- Resolution: Auto, Native, 1440p, 1080p or 720p. Auto records at your display's full resolution, up to 4K, when your graphics card can capture the screen.
- Frame rate: Auto, 24, 30 or 60 fps. Auto uses 60 fps when your graphics card can capture the screen, otherwise 30 fps, and 30 fps with a webcam baked into the video.
Screen recordings are captured and encoded on your graphics card (Intel Quick Sync, NVIDIA NVENC or AMD AMF) when it supports it. That uses almost no processor time, so Briefcast and your other apps stay smooth while you record.
When everything is set, click Start Recording at the bottom-right. The Record / Present switch at the bottom-left changes Screen Options over to the live display.
Countdown
To give yourself a moment to get ready, turn on Settings → Recording → Countdown before recording and choose 3, 5 or 10 seconds. After you press Record, a large countdown appears in the middle of the screen; recording starts when it reaches zero. The countdown is never part of the video.
To cancel, click the countdown or press Record (or Ctrl+Shift+R) again.
While you're recording
The recording bar
A small floating bar shows the recording time. Under the time it shows the frame rate being captured, and warns if frames are being dropped (a sign your computer is struggling). It has:
- Pause / Resume. Paused time is left out of the finished video; the timer freezes while paused.
- Stop, the red square.
- Source icons for what's being recorded. With a separate webcam file, these become a Screen / Camera switch.
- Minimize, which shrinks the bar to just the time and Stop.
The bar starts hidden, so it doesn't appear in your recording. Press Ctrl+Shift+H to show or hide it. Drag it anywhere by its background.
The bottom bar of the main window also shows the time, pause and Stop while you record.
Switching between screen and camera
With Record webcam separately on, press Alt+Shift+V (or use the Screen/Camera switch) to cut the main picture to your camera and back, for example to talk to the viewer between demos. Briefcast remembers each switch; in the video editor, Apply view switches turns them into real cuts. Nothing is lost: both the screen and the camera are always recorded in full.
Hiding Briefcast's own controls
If you're recording a screen that shows Briefcast itself, press Ctrl+Shift+B to hide the recording buttons in the bottom bar so they don't end up in the video. Press it again to bring them back.
When you stop
The moment you press Stop, a window opens showing "Finishing your recording…". During this step, Briefcast:
- Cleans up the audio. It removes background noise (fans, hum, room echo), evens out your voice, turns system audio down while you talk, and sets a consistent loudness suitable for YouTube and podcasts. Turn this off in Settings → Recording → Enhance audio automatically to keep the sound exactly as recorded.
- Assembles the video from its parts, trimming any paused time.
For a long recording this can take a minute or two. You can hide the window; the file appears in your library when it's ready. Then the window shows the file's name, type, length and size, with buttons to:
- Play it in Briefcast.
- Convert format, for example to MOV or WebM.
- Open the folder it's in (click the file path).
Recordings are saved in the recordings folder of your Briefcast folder, named Recording_<date> unless you set another prefix in Settings.
Webcam-only and audio-only recordings
For camera-only recordings, the main window shows the live picture being recorded, including the side-by-side layout when several cameras are on. For audio-only recordings there's nothing to capture on screen; just speak, and stop when you're done.
Tips
- Close what you don't need. Recording a high-resolution screen while running heavy apps can drop frames; the recording bar warns you when it happens.
- Test your microphone first. Make a 10-second recording and play it back before a long session.
- Only one app can use a webcam at a time on Windows. If a camera won't start, close Zoom, Teams or any other app using it, and stop the live display if that camera is on it.